Made famous by artists including Alexander Calder, Bruno Munari, and Jean Tinguely, mobiles are a fantastic way for children to experiment with color and light.
In this activity, Jenna Planden from Mousse Art Studio shares how children can learn about the phenomena of color-mixing, translucency, opacity, and shadow by creating a colorful light mobile using repurposed plastic and wire.
What you need

Translucent plastic materials such as:
- Plastic binder dividers (these are the most inexpensive translucent plastic I could source and they are also much sturdier than cellophane, making it easier for children to cut)
- Light gels
- Cellophane
Hole punch:
- Single or three-hole punch. If you don’t have one, scissors or even a needle could be used to pierce holes through the translucent plastic materials
Craft wire:
- Pre-cut soft wire in strips (look in the florist section of craft stores). Pre-cut wire works well as there are not any kinks in them but any kind will do!
- Pieces of string would work if you were prepared to help your child tie lots of knots, or perhaps you might simply glue the shapes on the string and let dry.
A whiteboard marker (aka dry erase marker):
- Whiteboard markers allow children to draw or trace shapes onto the coloured translucent material. My daughter liked practicing drawing a circle by tracing an old bowl upside down. Once she cut out the shape following her lines, it erased easily.
A wooden dowel:
- If you don’t have a wooden dowel, you could also use a 40cm stick or a clothes hanger.
Let’s make it!
- Place the coloured translucent materials out with a whiteboard/ dry erase marker and scissors. Guide your child to draw, trace and cut out different shapes using objects from around the house. Children can also draw and cut freehand if they prefer.

- Help your child lay out their shapes on the table in the formation they would like their mobile in. Using the hole punch, make a hole in the top and bottom of each shape.

3. Thread the wire through the holes to connect each shape to the next one. Secure the wire around the shape in whatever way works (ie. coil it around, form a hook, etc.)

4. Attach the top piece of wire to the dowel. Add an additional piece of wire to form a hook at the top of the dowel.

Tip: If a hole punch is a new tool for your child, show them how to use it. Imagining the tool to be a hungry creature and showing them where the ‘mouth’ and ‘food’ are!
Let’s play
While creating, you can ask children:
- How does it feel to cut through the plastic with your scissors? How is it similar or perhaps different from cutting paper?
- What happens when you layer the coloured plastic on top of one another?
- Where have you seen that shape before?
After creating, you can ask children:
- What happens when you put the mobile in front of the light?
- What do you notice about the shadows and colour that are cast by your mobile?
- How do the colors of the mobile change as the sun or light source moves?

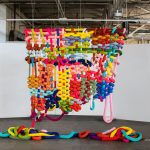
Contemporary art inspiration: Debbie Bean
This activity is inspired by the fused glass wall hangings of Debbie Bean, a Los Angeles-based artist who uses glass as her medium of exploration. Debbie creates hangings of diverse sizes from holiday ornaments to large-scale installations. Her playful and kinetic artworks are well-known for their ability to create magical rainbow shadows.

This post was written by Jenna Planden from Mousse Art Studio in Calgary, Canada. Follow Jenna on Instagram: @mousseartstudio.
Dawn Wilson, founder of The Amazing Art Cart has also created some amazing light mobiles. Check out her website and Instagram for lots of creative kids art ideas.
Related Posts
Make a soil tray – a land art activity for children